Thursday 10 October 2019

Download iOS 13.2 and iPadOS 13.2 Beta 2

Install iOS 13 iPhone
Apple today released the second developer beta of iOS 13. 2 and iPadOS 13.2 for all compatible iPhones and iPads. The first beta of iOS 13.2 had introduced Deep Fusion processing for the iPhone 11 and iPhone 11 Pro.
Deep Fusion uses Neural Engine on the A13 Bionic chip of the iPhone 11 and iPhone 11 Pro to capture more details.
The second beta of iOS 13.2 and iPadOS 13.2 is likely going to be all about bug fixes and minor enhancements, if any.
Apple will presumably release iOS 13.2 and iPadOS 13.2 to the public later this month likely after its October event.

Download iOS 13.2 and iPadOS 13.2 Beta 2

If your iPhone is already on the iOS 13 beta channel, you can head over to Settings -> General -> Software Update to grab the iOS 13.2 beta 2 update. The same also applies for the iPadOS 13.2 beta 2 update.
In case your iPhone or iPad is running the stable version of iOS 13.1 or iPadOS 13.1, you will have to first install the developer beta profile on your device.
Alongside the second beta of iOS 13.2 and iPadOS 13.2, Apple has also released the second developer beta of watchOS 6.1. A public beta release of all three OSes should happen later this week.
Noticed any other changes in iOS 13.2 or iPadOS 13.2? Drop a comment and share them with us!Tips:
Recover Photos, Videos, Contacts, Messages, Notes, Call History & Calendar from iPhone. Recover Lost or Deleted Data from Your iPhone in Just a Few Clicks. Free Download Now. Download Free Trial Now. Do-It-Yourself Software. 3 Million+ Happy Customer.
Also Read:h33t proxy


Sunday 8 September 2019

Apple’s 2019 iPhone 11 Event Start Time


In just over 48 hours from now, Apple will be announcing the iPhone 11, Apple Watch Series 5, and more. The company’s ‘By Innovation Only’ event is scheduled to take place on September 10th at the Steve Jobs Theater in Apple Park. Wondering the start time of the event in your time zone so that you can watch it live? Find that out here.

Apple only invites selected media from the press and online community to its events. For others though, it live streams the event so that they can watch it live as well. Depending on where you live, the start time of the iPhone 11 event will vary due to time zone differences.
iPhone 11 Event Start Time in Your Time Zone

Check out the table below to find out when Apple’s September 10 iPhone 11 event will start in your time zone so you can plan your day accordingly.


A higher resolution version of the screenshot can be found here.

* = Adjusted for DST or summer time (65 places).

Tue = Tuesday, 10 September 2019 (120 places).

Wed = Wednesday, 11 September 2019 (23 places).

In case you don’t find your city in the screenshot above, head over to this TimeandDate link to find the event start time in your local timezone.

You can find all the details on how to watch the 2019 iPhone 11 event live over here.Tips:rarbg proxy


As always, we’ll be bringing exhaustive coverage of the event, so don’t forget to follow us on Twitter, Facebook, and RSS. We’re super excited, can’t wait to find out what Apple has in store for us.

Wednesday 24 July 2019

2019 iPhone 11 Concept with Horizontal Triple-Camera System Looks Much better Than Leaked Renders


Leaked renders have already given us a look at the iPhone 11 and iPhone 11 Max and they don’t really look that attractive. Apple is following the same design trend as the iPhone X/XS series, with only some minor design tweaks. And that rear camera hump looks uninspiring at best. What if Apple went with a horizontal camera setup on the iPhone 11 as Samsung did with the Galaxy S10?

As renders from designer Philip Goolkasian shows, an iPhone 11 with a rear horizontal camera setup looks notably better when compared to the rectangular camera hump we have seen on the iPhone 11 renders.

The horizontal setup would provide Apple with enough space to not only include three 12MP cameras but also add other useful sensors like a flood illuminator and proximity sensor.


The design is reminiscent of the Nexus 6P which had a similar camera setup at the back. The visor glass for the camera looks very attractive and gives the back a very catchy look when compared to the rectangular camera hump.


The designer does envision the phone without any camera hump, though that’s not something I believe is possible with the current technology.

While Apple can launch an iPhone without a rear camera hump, it would mean using a smaller camera sensor which in turn would lead to inferior image quality. However, it is definitely possible for Apple to launch an iPhone with horizontal camera setup, though it would probably require the company to rearrange the internal components.Also Read:Virtual Girlfriend Apps

Also Read:icefilms alternative


Maybe for the 2020 iPhone — which is expected to come with some major changes, Apple will take some inspiration from the renders shown above and go with a horizontal camera setup.

[Via YD]

Monday 22 July 2019

How to Install iOS 13 Beta on Your Device


Part 1 How to Install iOS 13 Beta on Your Device

Following are the steps to install iOS beta on your device:
1. Compatible Devices

Before you proceed to download iOS 13 beta, you need to confirm whether your device is compatible with the new firmware. Apple provided an official list of devices that are compatible with iOS 13 beta. They are:


iPhone XS and XS Max


iPhone X


iPhone XR


iPhone 8 and 8 Plus


iPhone 7 and 7 Plus


iPhone 6S and 6S Plus


iPhone SE


iPod Touch (7th generation)


2. Sign Up for iOS 13 Beta

Once you have confirmed that your device is compatible with iOS 13 beta, you will need to enroll in the iOS beta program.

Follow these instructions to sign up for iOS 13 beta:


Visit Apple’s Beta Software Program website on your favorite browser.


Click on the Sign-Up button to enroll in the iOS beta program.


Follow the on-screen instructions to complete the registration process.
3. Backup Your Device

After enrolling in the iOS beta program, it is recommended that you back up your device data as installing the new firmware may erase content so you would want to have the backup just in case. You can back up data via iTunes or iCloud.

Follow these instructions to back up data via iTunes:


Connect your iPhone to your PC.


Launch iTunes and select your iPhone in it.


Next, click on the Back Up Now option to start the backup process.

Follow these instructions to back up data via iCloud:


Connect your iPhone to a Wi-Fi network.


Launch the Settings app.


Navigate to iCloud > iCloud Backup and then tap on the Back Up Now option. The backup process will begin.
4. Download and Install

After backing up your valuable iPhone data, you can proceed to download and install iOS 13 beta.

Follow these instructions:


Visit Apple’s Beta Software Program website on your iPhone.


Sign in using your Apple ID and agree to the terms and conditions.


Next, head to the iOS tab via the Enroll Your Devices link.


Now find and tap on the Download Profile option. It will be shown under the Install Profile section. Download will begin.


Once the download is completed, launch the Settings app. You will see a notification that the profile can be installed. Tap that notification and follow the on-screen instructions to install the profile. The device will restart.


Next, launch the Settings app and navigate to General > Software Update. Then tap Download and Install option once the notification about iOS 13 appears.


Bonus 1: Don’t Have Enough Space to Install iOS 13? Clean It Now!

Read more:usb bootable software

Read more:best deep web sites

Thursday 18 July 2019

Everything New in iOS 13 Beta 4: Quick Action Updates, Share Sheet Changes and More


Apple this morning released the fourth beta of iOS 13 for developers, introducing bug fixes and adding and refining iOS 13 features.


Now that we're into the fourth beta, changes and updates are getting more minor, but there are still some small but notable tweaks that are worth highlighting in today's beta.


- Quick Actions - There's a refreshed look for Quick Actions on the Home screen, which adds a new "Rearrange Apps" option that lets you quickly get to the wiggle mode that allows apps to be moved around.


- Quick Actions Menu Size - The menu that pops up when using a Quick Action is also smaller in size with less obtrusive icons that have also been relocated to the right side of the menu interface.


- 3D Touch Settings - In the Accessibility section of the Settings app, there are new options for 3D Touch in the 3D & Haptic Touch section (which was previously just 3D Touch). There's a new "Touch Duration" section alongside the sensitivity slider. The Touch Duration option changes the amount of time it takes to reveal content previews, actions, and contextual menus.


- Share Sheet - Some minor design changes have been made to the Share Sheet in iOS 13, tweaking the colors and adding some transparency.


- Voice Messages - When using the option in Messages to record a voice-based message, there's a new icon for the option. It's now a waveform rather than a microphone icon.


- Widgets - When editing Widgets in the Today View, you'll see a new look for the edit button, which is now pill-shaped rather than circular.


Know of a feature that's new in iOS 13 beta 4 that we left out? Make sure to let us know in the comments and we'll update this article.Sponsor ads:

Gihosoft RePicvid Free Photo Recovery Software provides a free photo recovery software for windows to help users recover the deleted or lost photo for free.

If you lost data after you updated to a new iPhone, you can always use Gihosoft iPhone Data Recovery to get the data back from the old iPhone or backup.You may also like: iphonerecovery.com

Wednesday 22 May 2019

How To Show Network Speed On Status Bar For Any Android Device


How To Show Network Speed On Status Bar For Any Android Device

STEP 1: Download Network Speed – Monitoring Speed Meter from the Play Store. Open Network Speed and read the features of the app.

STEP 2: The main screen of the app will show you details like Today’s Usage, Monthly Usage, WiFi Usage, etc in numbers as well as a graph that is constantly moving.

STEP 3: You will see a yellow bar with text written on it. Tap on it.

STEP 4: You’ll be greeted with the Permission Manager.

Give permissions to Draw Overlay, Read Phone State, App Usage Access, Location Access, and Notification Access.

You’ll be redirected to Usage data access on your phone so grant permissions for Network Speed.

STEP 5: This will make the app function smoothly. Go to Settings and explore other options.

STEP 6: Make sure Notification Bar toggle is turned on.

There’s another option called Floating Widget that drops a network stats widget in the middle of the notification bar.

STEP 7: Other toggle options include Usage Monitoring and Show in Quick Settings.

STEP 8: Usage Monitoring will give you detailed information on how much data you’ve used. You can even set usage alert if you fear you’ll all your data.


STEP 9: Enabling Show in Quick Settings will make it appear on your quick settings panel.

STEP 10: Another set of features to change are Speed Unit and Update Interval.

STEP 11: Speed Unit lets you choose whether the date should be displayed in KBs or MBs, while Update Interval gives you a specific time in which the network updates the information.

STEP 12: If you are very much worried about the stats showing on your status bar, make sure to hit the Keep Alive switch on as it will force the app to keep running in the background.

While it doesn’t consume much battery, Continuous Monitoring feature uses an intensive battery.

This is a handy way to know how much data is being uploaded or downloaded. If you always use up all your data and are looking for ways to save it, we’ve recently covered an article which will help you to extend the usage of your existing data pack. Do you personally use any app for showing data information? How much does it matter? Let us know in the comments below.

Also Read:7 Best Alternatives to Megashare for Movie Watching in 2019

Also Read:Unbrick Your Bricked iPhone XS/XR/X/8/7 in 2019

Also Read:10 Best Reverse Image Search Engines and Apps for Android in 2019

Also Read:5 Ways to Fix If AOL Mail Is Not Working On Your iPhone

Also Read:Top 8 Best After Effects Alternative Software Free to Use on Windows/Mac/Linux 2019

Also Read:The Best 10 Websites to Download Bollywood Movies Online for Free in 2019

Also Read:SpyHuman Review and Its Top Best 10 Alternative in 2019

Also Read:Reddit NFL Streams – Watch NFL Live, Download, and Join Discussion

Also Read:Top 15 iTunes Alternatives for Windows, Mac and Linux

Also Read:How to Transfer Photos from Android to PC/Mac/Laptop

Also Read:Best Free Video to GIF Converter for Computer, iPhone, Android

Friday 12 April 2019

No Internet Connection on iPhone


Top 10 Ways to Fix No Internet Connection iPhone

After having a backup of your data, it’s time to fix “no internet connection iPhone”. Mentioned below are the 10 ways you can try.
Way 1. Restart Your Device

The obvious first solution to most of the iOS-related issues is restarting the respective device.

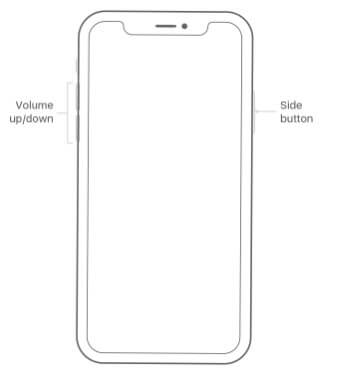
Restart iPhone X or later

Step 1: Press Side button and any of the volume buttons simultaneously and hold them.

Step 2: Once the slider appears, drag it to turn the device off.

Step 3: Press and hold the side button again to turn the device on.


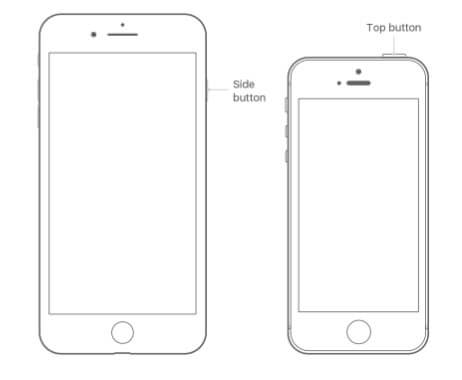
Restart iPhone 8 or older

Step 1: Press the Top or Side button and hold it.

Step 2: Turn the device off by dragging the appeared slider.

Step 3: Press and hold top or side button to see the Apple logo.


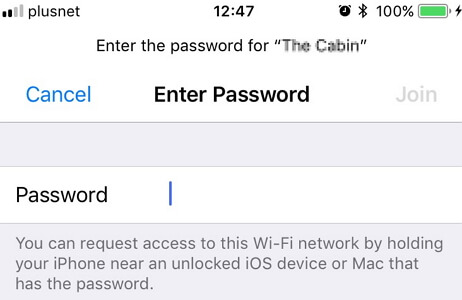
Way 2. Reenter WiFi Passcode

Sometimes, it may work if you reenter the WiFi password of the respective network.

Step 1: Go to Settings. Then, go to WiFi.

Step 2: Tap on the name of the network and tap “Forget this network” option.

Step 3: Tap on the same network name and reenter the passcode.


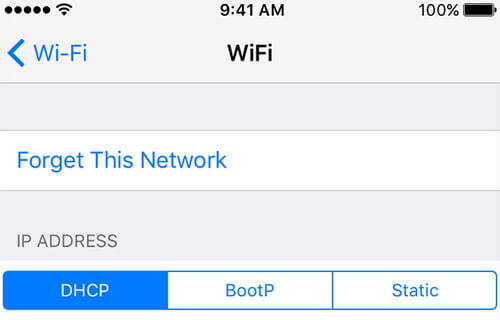
Way 3. Forget WiFi Network

If there’s an unstable WiFi network connected to your iPhone, it can cause some troubles. In this case, it is better to forget that network. Here are the steps.

Step 1: Go to Settings app and tap on Wi-Fi.

Step 2: Locate the network that you suspect as faulty and tap on its (i) icon.

Step 3: Tap on the option “Forget This Network”.


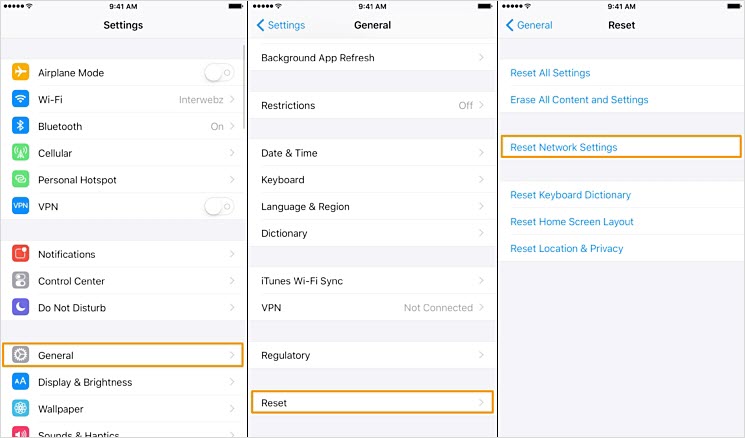
Way 4. Reset Network Settings

You can also try resetting the network settings of the iOS device. This would solve many of the issues related to networks.

Step 1: Launch Settings app on the Home Screen and tap on General.

Step 2: Tap on Reset option.

Step 3: Then choose to Reset Network Settings.

Step 4: Confirm network settings reset.


Way 5. Turn Airplane Mode on and off

Toggling airplane mode of the device can necessarily fix several random issues related to your network settings.

Step 1: Launch Settings app on your Home Screen and then go to Airplane Mode.

Step 2: Tap on the switch next to Airplane Mode so it will be activated.

Step 3: Reboot your device (you already know how to do it).

Step 4: Go to Settings app once again and tap on Airplane Mode option.

Step 5: Tap on the switch next to Airplane Mode and it will be disabled.


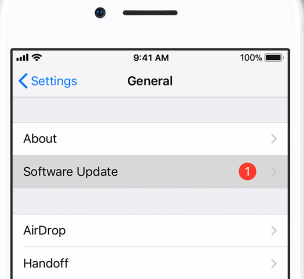
Way 6. Update iOS Version to the Latest

Sometimes, the issue might have occurred as you haven’t updated the iOS version for a while. So, it is better to check if there’s an available update and get it installed.

Step 1: Tap on Settings app and go to General.

Step 2: Locate the option Software Update and tap on it. If an update is pending, it will be notified on the screen. In that case, connect your device to a power source and download the update.


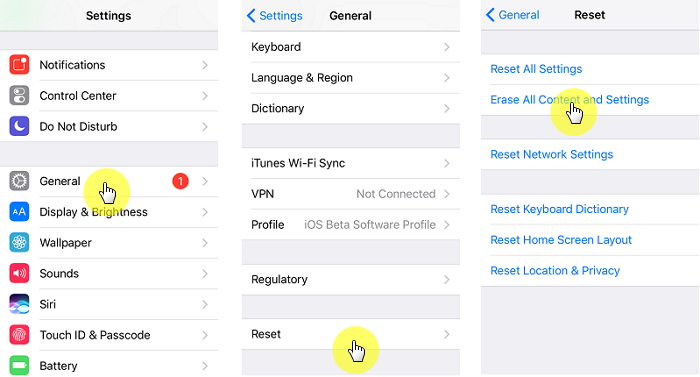
Way 7. Erase All Content and Settings

If none of the above methods helped you, try erasing all content and settings. This is also called factory reset. However, you will lose all the data upon performing this fix.

Step 1: Tap on Settings and navigate to General.

Step 2: Scroll down and tap on Reset.

Step 3: Tap on Erase All Content and Settings. Confirm the reset.

Step 4: Then, you can start setting up the device from the scratch.


Also Read:Top 25 Best Netflix Cookies for You to Use Netflix for Free 2019

Also Read:Top 10 iPhone Emulators for Windows PC, Mac and Android 2019

Also Read:Download Latest Samsung USB Drivers for Mobile Phones on Windows

Also Read:Download Korean Drama for Free 2019

Also Read:Websites Like PrimeWire

Also Read:KissAnime Alternative Websites

Sponsor ads:

Gihosoft Free iPhone Data Recovery:https://www.gihosoft.com/iphone-data-recovery-free.html

Gihosoft iPhone Data Recovery Free

Free iPhone Data Recovery Software for Windows/Mac

Recover up to 12+ types of files, including contacts, SMS, photos, WhatsApp, Viber, notes, etc.

Restore lost data from iOS devices directly or from iTunes and iCloud backup

Recover iPhone data lost due to iOS upgrade/jailbreak, accidental deletion, device lost or broken

Support all the latest iPhone, iPad and iPod Touch

Both Free and Pro version.

If you lost data after you updated to a new iPhone, you can always use Gihosoft iPhone Data Recovery to get the data back from the old iPhone or backup. You may also like:iphonerecovery.com

Download iOS 13.2 and iPadOS 13.2 Beta 2

Apple today released the second developer beta of iOS 13. 2 and iPadOS 13.2 for all compatible iPhones and iPads. The first beta of iOS 1...