Wednesday 6 March 2019

Transfer Ringtones from Old iPhone to New iPhone


Transfer Ringtones from Old iPhone to New iPhone Using iTunes

When an iPhone user thinks of transferring their data from the old iPhone to the new iPhone, or the other way around, the first tool that comes to their mind is the iTunes. iTunes is the standard program they use. The only problem with the using the iTunes is that it can be complicated. Using the iTunes means that you will be able to transfer the music/ringtones from your old iPhone to iTunes, and from the iTunes to the new iPhone. In this article, we will guide you through using it to transfer ringtones from your old iPhone to your new iPhone. Here is how:

Step 1: Connect your iPhone to your computer and then launch iTunes.

Step 2: Select your device on the iTunes interface that is displayed on the screen of your computer. Open the “Tones” section.

Step 3: From here, click on the “Sync Tones” link/option and sync all the ringtones that is on your iPhone to iTunes and then click on the Apply button. Once this is done, disconnect your old phone from your computer.


Step 4: Once you’ve disconnected your old iPhone from your computer, connect the new one.

Step 5: Click the device icon and click on the “Tones” option that is on the left menu and finally click on the Sync Tones.

Step 6: Choose the Ringtones you’d like to have synced and click the Apply option.


How to Make Your Own Ringtones for Your New iPhone for Free

When it comes to customizing ringtones for your iPhone, iMyFone TunesMate is a great tool to use. Using the TunesMate will only take few minutes, it takes just three steps, these steps include connecting your iPhone to the computer, choosing the music file and then making the ringtone.Also Read:How to Recover Files and Data from Formatted Hard Disk Drive
Also Read:5 Best Volume Booster Apps for iPhone/iPad to Make Your Music Louder 2019
Also Read:How to Recover Lost Files after System Restore
Also Read:How to Permanently Delete Photos on Android Phone without Recovery
Also Read:Best Package & Shipment Tracking Apps for iPhone/iPad in 2019
Also Read:How to Create or Open Zip/Rar Files on Your iPhone or iPad
Also Read:How to Recover Deleted Safari Bookmarks & History on iPhone or iPad
Also Read:How to Recover Deleted WhatsApp Messages on Android from/without Backup
Also Read:How to Recover Deleted Notifications on Android Phone
Also Read:How to Backup and Restore WhatsApp Message on Android or iPhone

Sunday 3 March 2019

What Does iCloud Drive Back Up and How to View Data in iCloud Drive?

What Does iCloud Drive Back Up and How to View Data in iCloud Drive?

Apple is consistently releasing new platforms and functions that enhance the user experience, and one of most popular is the iCloud Drive. It helps to protect your favorite files, without clogging up your devices and wasting unnecessary storage space. We’re going to discuss everything you probably interest in about the iCloud Drive in this article.


If you see it, it is likely that you have exceeded the limit of the number of iCloud accounts you can have on one device. If you are sure you haven't, the following solutions should eliminate the problem.


What Does iCloud Drive Back Up?


How to View Data Stored in iCloud Drive?


Difference Between iCloud Drive and iCloud Backup?


How to Back Up iCloud Drive Files?


iCloud Drive Is Not Working? Find the Solutions!
1. What Does iCloud Drive Back Up?


There’s a variety of features that make iCloud Drive such an amazing platform, hence why millions utilize it every day. You can back up all of your vital files, such as photos, documents, presentations and other types of data. But, you cannot back up anything that is larger than 50GB, or anything that exceeds your iCloud storage limit.


Sponsor ads:How to Download & Save Facebook Videos to Camera Roll on iPhone/iPad 2019 Sponsor ads:Top 6 Best Vumoo Alternative Sites for You to Watch and Download Movies 2019

Backups aren't the only thing you can do with iCloud Drive, though. You can keep all of your data up to date, no matter what device it's on, in one centralized place. In addition, you can create new files within the drive, and they'll appear on any device that you access it from. Oh, and you can share your data with anyone in seconds.


2. How to View Data Stored in iCloud Drive?


As you aren't limited to what device you can access your iCloud Drive on, you have total freedom with viewing your data. Now, the main ways to hop on to your iCloud Drive are through your PC, Mac or iOS devices.


If you go down the PC route, you can just use any supported web browser and head to iCloud.com, then log into your account. Alternatively, you can go to iCloud Drive in File Explorer if you have Windows 7 or later. With Mac, you can find your iCloud Drive by searching for it in Finder. Moreover, with iOS devices, either use the Files app or use the iCloud Drive app on iOS9 or iOS10.


3. Difference Between iCloud Drive and iCloud Backup?


So many people struggle to distinguish iCloud from iCloud drive, and it's very easy to confuse the two. But, don't worry, we're here to help.


iCloud: iCloud is a basic way to store all of your data in the cloud, and a quick way to sync that data across devices. However, iCloud doesn't backup all of your data and your storage limit is capped unless you pay for more.


iCloud Drive: iCloud Drive is Apple's alternative to Dropbox or OneDrive, in that it's a cloud-based platform where you can backup, share and view data. It keeps data synced between all of your devices no matter what.


4. How to Back Up iCloud Drive Files?


If you have no idea how to back up your iCloud Drive files, then you can follow this awesome guide – just click here and follow the instruction to back up important files in iCloud Drive.
5. iCloud Drive Is Not Working? Find the Solutions!


As with most Apple functions, there's a strong chance that you may encounter problems from time to time. One of the common issues is iCloud Drive taking up too much space on your computer, which you can find a solution from this link. Another is iCloud Drive not syncing to your Mac or PC, and here the post offers solutions to it.


Ultimately, iCloud Drive is an excellent document-sharing platform where you can backup and view your precious data. Check it out, what have you got to lose?

Top 3 Ways to Hide Apps on iPhone 2019

Top 3 Ways to Hide Apps on iPhone 2019

Is there a way to hide apps on iPhone? I want to prevent my kids playing games on my device. Any help would be much appreciated!

If there are apps on your iPhone that you don't want anyone to know about, then you will be glad to know that you can hide those apps quite conveniently. There are a number of ways to hide both stock and downloaded apps.

Part 1. Top 3 Ways to Hide Apps on iPhone


Method 1: How to clear history on iPad with Safari


Method 2: How to clear history on iPad with Google chrome


Method 3: One-click to clear all junk files on iPad

Part 2. Want to Prevent Privacy Leak? You Need to Permanently Erase App Fragments
Top 3 Ways to Hide Apps on iPhone
Method 1: Use Restrictions to Hide Apps on iPhone?

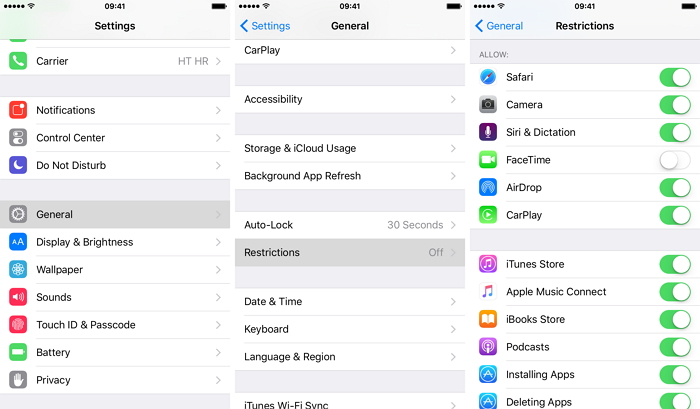
There is a built-in feature in iOS called Parental Controls. You can use it to hide your stock apps pretty conveniently. It is also known as Restrictions. This feature is very helpful in providing much needed privacy to your data. The process to hide stock apps via Restrictions is straightforward. So if you no longer want anyone to see your apps, then it is recommended that you take advantage of this amazing built-in feature.
Enable Restrictions on iPhone

Follow these instructions to enable Restrictions on your iPhone:

Step 1. Open Settings app on your iPhone.

Step 2. Navigate to General > Restrictions.


Step 3. Now select Enable Restrictions. You will need to input your Restrictions passcode to confirm your action.


Step 4. Once the Restrictions are enabled, you can easily hide your stock iPhone apps such as Podcasts, FaceTime, Camera, etc.
Hide Stock Apps on iPhone

Now follow these instructions to hide stock apps via Restrictions:

Step 1. Open Settings app on your iPhone and navigate to General > Restrictions. You'll be asked for the Restrictions passcode.

Step 2. Now use the switch shown next to the apps in order to hide them.


Hide Downloaded Apps on iPhone

Just like stock apps, you can also hide your downloaded apps (third-party apps that you have downloaded from the App Store). You can hide such apps on the basis of their age-restriction. There is also an option to hide them completely regardless of what their age-restriction may be. You will need to use the Restrictions feature for this.

Here are the steps to hide downloaded apps on iPhone:

Step 1. Open Settings app on your iPhone. Navigate to General > Restrictions. You need to input your iPhone's Restrictions passcode to gain access.

Step 2. Now scroll down to Allowed Content > Apps.

Step 3. Here, you can select which type of apps you want to allow. To do this, you will need to tap on the specific age group. Alternatively, you can simply use the Don't Allow Apps option to hide all your iPhone apps.


Method 2: Using Folder to Hide

There are a number of stock apps on your iPhone that you rarely use. While you can hide those apps in a folder on the second screen, there is a better way to hide them so no one can see them.

Follow these instructions to hide apps on iPhone using folder:

Step 1. Tap and hold an app until all the apps wiggle.

Step 2. Drag one of the wiggling apps towards another app, then it will establish a folder automatically.

Step 3. Using this method, adding another 7 apps to this folder so that it can fill up the first page of this folder.


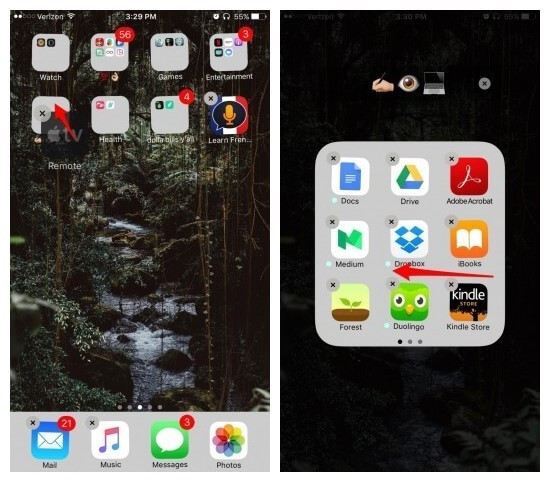
Step 4. Drag the app you want to hide toward the folder. Then it will be put at the second page of this folder. That's it!
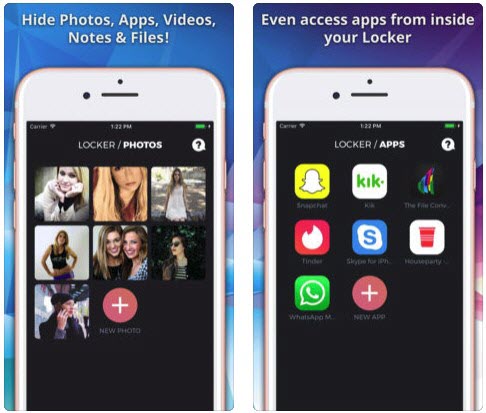
Method 3: App to Hide Apps on iPhone – Locker

Locker is a third-party app available on App Store that you can use in order to hide your apps and protect them with your fingerprint. Not only does Locker allow you to remove apps from your Home Screen, but you can also hide your notes, videos, photos, and other files via this app. You can access the hidden content via Locker. You can also lock the content via PIN code. Furthermore, you can write your private notes directly inside this app and store your sensitive information conveniently.


Want to Prevent Privacy Leak? You Need to Permanently Erase App Fragments

Sponsor ads:

Gihosoft Free iPhone Data Recovery:https://www.gihosoft.com/iphone-data-recovery-free.html

Gihosoft iPhone Data Recovery Free

Free iPhone Data Recovery Software for Windows/Mac

Recover up to 12+ types of files, including contacts, SMS, photos, WhatsApp, Viber, notes, etc.

Restore lost data from iOS devices directly or from iTunes and iCloud backup

Recover iPhone data lost due to iOS upgrade/jailbreak, accidental deletion, device lost or broken jihosoft Free iPhone Data Recovery

Support all the latest iPhone, iPad and iPod Touch

Both Free and Pro version.

If you lost data after you updated to a new iPhone, you can always use Gihosoft iPhone Data Recovery to get the data back from the old iPhone or backup.You may also like: iphonerecovery.com

If you use android phones, please choose Gihosoft Android Data Recovery.

With Gihosoft Android Data Recovery, no longer afraid of data loss!

Must read:Youtube video downloader for pc

Gihosoft RePicvid Free Photo Recovery Software provides a free photo recovery software for windows to help users recover the deleted or lost photo for free.

Jihosoft Android Data Recovery: the best Android Data Recovery software for Windows and Mac to recover deleted contacts, messages, photos, videos, WhatsApp and etc from Android devices.Tips:How to transfer messages from iPhone to iPhone

Friday 1 March 2019

What to Do When You Can’t Uninstall iTunes Windows 10?


1 Manual Fix for iTunes Won’t Uninstall Windows 10

If you don’t want to use software to automatically fix the problem, then there is manual fix as well that you can try. The process is a bit lengthy and complicated as compared to the automatic fix.

Follow these instructions:

Step 1: Open Registry Editor on your Windows PC.

Step 2: Once it is open, select Edit > Find, and then type itunes64.msi in the textbox. Also change the Look at boxes and make sure that Data option is ticked. Click Next after configuration.


Step 3: After the above step, you will be navigated to this: HKEY_LOCAL_MACHINE\SOFTWARE\Classes\Installer\Products\{some numbers and letters}\SourceList


Step 4: Now select the immediate parent key that contains a long string, right click on it and then choose Export. Save it to the location of your choice. Rename the file as iTunes.reg.

Step 5: Click the same string again and Delete it using the context menu. This will prevent Windows Installer from searching the .msi when reinstalling iTunes.


If the problem can’t uninstall iTunes windows 10 is not solved, then follow these additional steps:


Step 1: Double click the iTunes.reg file that was saved in the above mentioned steps. This will restore the data to the registry.

Step 2: Now install missing components in order to unpack the install of the previous iTunes installation. This will allow you to extract the required .msi file.

Step 3: Once the file is extracted, double-click on it and the component will be uninstalled.

Step 4: Now you can proceed to the uninstallation/reinstallation of iTunes. The problem should be solved now.
How to Uninstall iTunes When There is No Problem

Uninstalling iTunes is a straightforward process if there is no problem. Follow these instructions:

Step 1: Open Control Panel on your Windows PC.

Step 2: Navigate to Programs > Programs and Features.

Step 3: Find and choose iTunes and then click the Uninstall option to uninstall it.

Step 4: Now uninstall all the components that are related to iTunes. You need to uninstall them in this particular order:Sponsor ads:

Gihosoft Free iPhone Data Recovery:https://www.gihosoft.com/iphone-data-recovery-free.html

Gihosoft iPhone Data Recovery Free

Free iPhone Data Recovery Software for Windows/Mac

Recover up to 12+ types of files, including contacts, SMS, photos, WhatsApp, Viber, notes, etc.

Restore lost data from iOS devices directly or from iTunes and iCloud backup

Recover iPhone data lost due to iOS upgrade/jailbreak, accidental deletion, device lost or broken

Support all the latest iPhone, iPad and iPod Touch

Both Free and Pro version.

If you lost data after you updated to a new iPhone, you can always use Gihosoft iPhone Data Recovery to get the data back from the old iPhone or backup.You may also like: iphonerecovery.com

If you use android phones, please choose Gihosoft Android Data Recovery.
jihosoft Free iPhone Data Recovery
With Gihosoft Android Data Recovery, no longer afraid of data loss!

Must read:Youtube video downloader for pc

Gihosoft RePicvid Free Photo Recovery Software provides a free photo recovery software for windows to help users recover the deleted or lost photo for free.

Jihosoft Android Data Recovery: the best Android Data Recovery software for Windows and Mac to recover deleted contacts, messages, photos, videos, WhatsApp and etc from Android devices.Tips:How to transfer messages from iPhone to iPhone


Apple Software Update


Apple Mobile Device Support


Bonjour


Apple Application Support (64-bit)


Apple Application Support (32-bit)

Step 5: Once all the components are uninstalled, restart your computer.
Conclusion

In conclusion, there are a number of ways to uninstall iTunes if you can’t uninstall iTunes windows 10 the usual way. Automatic method to uninstall iTunes (TunesFix) is the best way because not only is it convenient, it also takes significantly less time. Manual way to uninstall iTunes is complicated and takes more time.
You may also like:

Also Read:5 Best Funny Face Swap Apps For iPhone in 2019 

Download iOS 13.2 and iPadOS 13.2 Beta 2

Apple today released the second developer beta of iOS 13. 2 and iPadOS 13.2 for all compatible iPhones and iPads. The first beta of iOS 1...